
Crystal Ice Nails: Creating 3D Frozen Effects on Your Nails
Winter fashion has evolved beyond simple dark colors and glitter. The latest trend taking over social media and salons is the concept of Icy Nails with a three-dimensional twist.
New Year Beauty: This frozen aesthetic is actually one of the leading styles for the season. You can see where it ranks among other top looks in our guide: [January Nails: The Top Nail Trends to Start the Year in Style].
To achieve true success in nail artistry, you must move beyond flat polish and embrace texture. This style mimics the clarity of icicles, the sparkle of fresh snow, and the depth of frozen quartz. It requires specific techniques to build structure and manipulate light, ensuring your manicure looks like expensive crystal rather than simple plastic.
❄️ Complete the Aesthetic: “This frozen look on your fingertips is the perfect match for the season’s hottest face trend. Pair your crystal nails with our [Frosted Makeup: The Modern Icy Guide] to achieve a head-to-toe ‘Snow Queen’ energy that looks stunning in any light.”
You create this look by layering sheer colors, reflective powders, and high-viscosity builder gels. The goal is to capture light from every angle, creating a wet, frozen appearance that remains durable. You must understand the chemistry of your products to prevent lifting and ensure clarity. This guide will walk you through the professional strategies needed to sculpt, color, and seal these designs, transforming your hands into a winter masterpiece.
The Foundation of the Frozen Look
Start by selecting the right base materials, as clarity is the most critical factor in this design. When you choose your products, you are setting the stage for the light refraction that defines Icy Nails. If your base is cloudy or your application is messy, the 3D effect will look cluttered rather than crystalline. You must focus on preparation and product selection before the brush even touches the nail. Additionally, you can follow these fundamental steps to prepare your canvas for 3D work.
- Perform a dry manicure to remove all cuticle tissue from the nail plate, ensuring the gel adheres perfectly without lifting at the edges.
- Select a sheer, “jelly” style base color—usually in pale blue, soft lavender, or milky white—to create a translucent wash of color that mimics ice.
- Apply a clear builder gel base layer to add strength and even out the nail surface, providing a smooth foundation for the textured art.
- Use a high-quality non-wipe top coat between layers to create “sandwiches” of design elements, adding depth to the final look.
- Invest in a dedicated liner brush for detailed sculpting work, allowing you to manipulate thick gel into precise droplets and ridges.
- Ensure your LED/UV lamp is powerful enough to cure thick layers of clear gel to prevent uncured product in the center of your 3D shapes.
In short, you must prioritize the quality of your clear gels and the precision of your prep work. Without a flawless, transparent base, the Icy Nails effect will lack the necessary depth and brilliance.
Essential Tools and Materials
The tools and materials you use are the building blocks of your success. Unlike a standard manicure, creating 3D frozen effects requires a specialized toolkit designed for sculpting and light manipulation. Here are the essential items you need in your station.
- High-Viscosity Builder Gel This is your sculpting clay. You need a thick, non-runny clear gel (often called “hard gel” or “structure gel”) that holds its shape when you place a bead on the nail.
- Aurora or Mermaid Chrome Powder To get the iridescent shine of ice, you need a transparent chrome powder that shifts color (usually blue/pink/gold) without covering the base color.
- Silicone Sculpting Tools These allow you to mold the gel without adding air bubbles. They are easier to clean than brushes and perfect for creating organic water shapes.
- Jelly Gel Polishes These translucent polishes provide tint without opacity. They are crucial for the “frozen water” look.
- Rhinestone Glue Gel Sometimes you need an adhesive that is even thicker than builder gel to attach large crystal accents or create very high peaks.
- Fine Grit Buffer You need this to smooth out the base application. A perfectly smooth surface under the chrome powder is non-negotiable for a mirror-like finish.
- Lint-Free Wipes Dust and lint are the enemies of clear nail art. Use high-quality wipes to ensure no debris gets trapped inside your ice layers.
- Isopropyl Alcohol (90%+) Used to clean your brushes and shape the gel. It helps manipulate the sticky inhibition layer without clouding the crystal clear finish.
By securing these specific tools, you equip yourself to handle the technical challenges of 3D sculpting. This preparation allows you to execute the Icy Nails trend with professional precision and clarity.
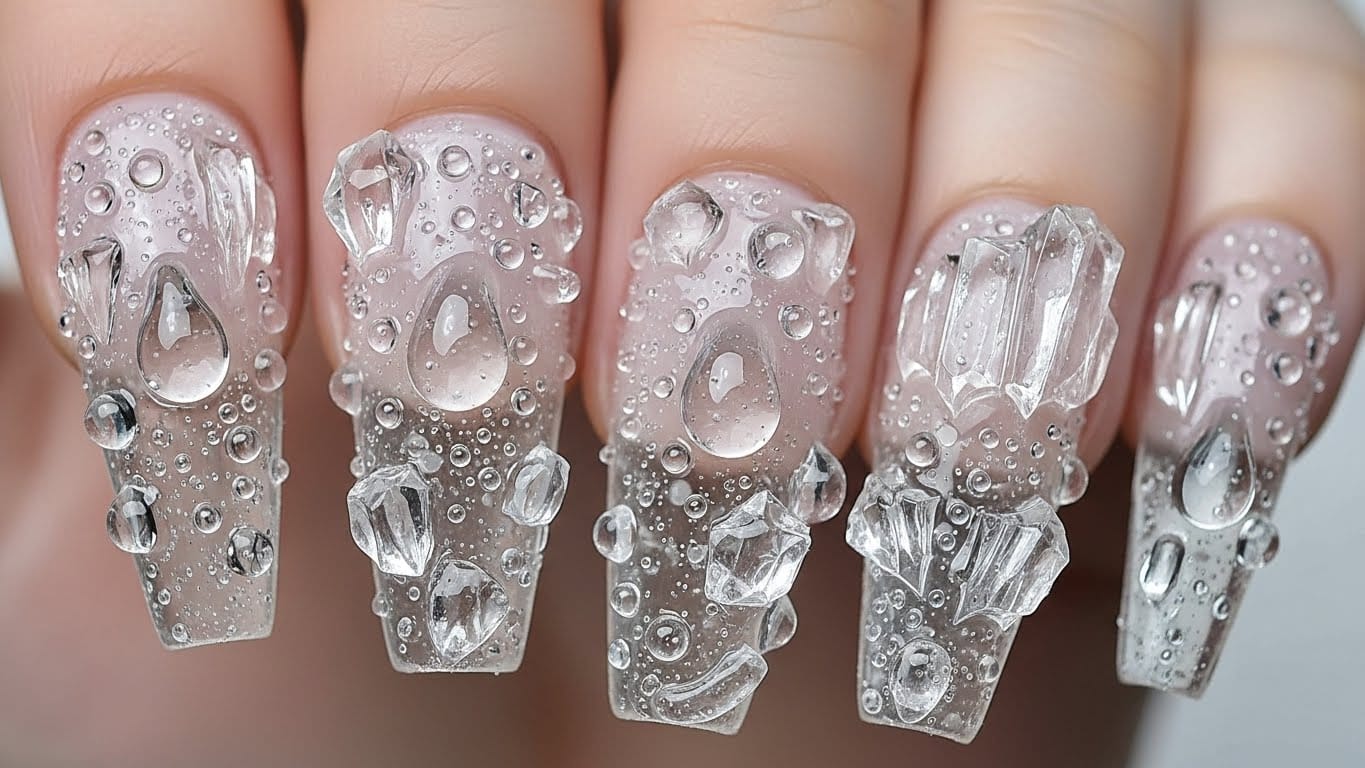
Technique: The Water Droplet Method
The “Water Droplet” or “Melting Ice” technique is the most popular way to interpret this trend. It involves creating organic, raised swirls that look like water frozen in time. Mastering this skill elevates your nail art from flat to sculptural. Here are the strategies for perfect droplets.
- Base Application Apply your sheer color and cure it. Then, apply a layer of non-wipe top coat and cure. Rub in your aurora powder immediately for a glazed background.
- Gel Placement Pick up a large bead of high-viscosity clear gel on a thin liner brush. Gently place it on the nail surface without pressing down, letting it float.
- Guiding the Shape Drag the tail of the bead slowly to create a swirl or a drip shape. Do not overwork the gel, or you will introduce air bubbles that ruin the clarity.
- Flash Curing Once you are happy with a single drip, flash cure it in your lamp for 10 seconds. This “freezes” the shape so it doesn’t flatten out while you work on the next one.
- Chrome Isolation For a metallic ice look, apply chrome powder only on the raised 3D swirls. This creates a stunning contrast between the flat base and the shiny, raised texture.
- Final Sealing Apply a final layer of top coat. You can either coat the whole nail (which softens the 3D effect) or use a liner brush to coat only the 3D parts to keep them sharp.
- Checking Angles constantly rotate the finger under the light to ensure the 3D shape is smooth and has a pleasing light reflection before the final cure.
Bypassing these technical steps can lead to flat, messy results. However, executing them with patience results in a stunning, high-fashion Icy Nails manicure that looks like custom jewelry.
Choosing the Right Gel Viscosity
Understanding gel viscosity is crucial for 3D art. Viscosity refers to the thickness and flow rate of the gel. Using the wrong type will make your “ice” melt flat or look chunky. Below is a comparison of gel types to help you choose the right product for your specific design goals.
Different brands label these differently, but the texture is the key indicator. You generally want a gel that does not self-level quickly.
| Gel Type | Best For | Characteristics |
|---|---|---|
| Soft Builder (Bottle) | Base layers, slight volume | Self-levels fast. Too runny for high 3D shapes. Good for encapsulation. |
| Hard Gel (Pot) | Extensions, medium 3D swirls | Thicker consistency. Holds shape for a few seconds. Requires filing to remove. |
| 3D Sculpting Gel (Solid) | High peaks, molding shapes | Clay-like texture. Does not move until cured. Best for distinct shapes. |
| Non-Wipe 3D Gel | Chrome application on top | Apply, cure, and chrome immediately. No sticky layer. Saves time. |
| Rhinestone Glue | Adhering large crystals | Extremely thick and sticky. Essential for attaching “ice” rocks securely. |
Note: If you are new to 3D art, start with a “Non-Wipe 3D Gel” in a tube. It allows you to draw the design directly onto the nail without needing a brush, offering better control for beginners.
Color Palettes and Effects
While the texture is the star, the color palette sets the mood. Icy Nails rely on cool tones and light manipulation. You are not painting a picture; you are creating an atmosphere. Here are the top color strategies to enhance the frozen aesthetic.
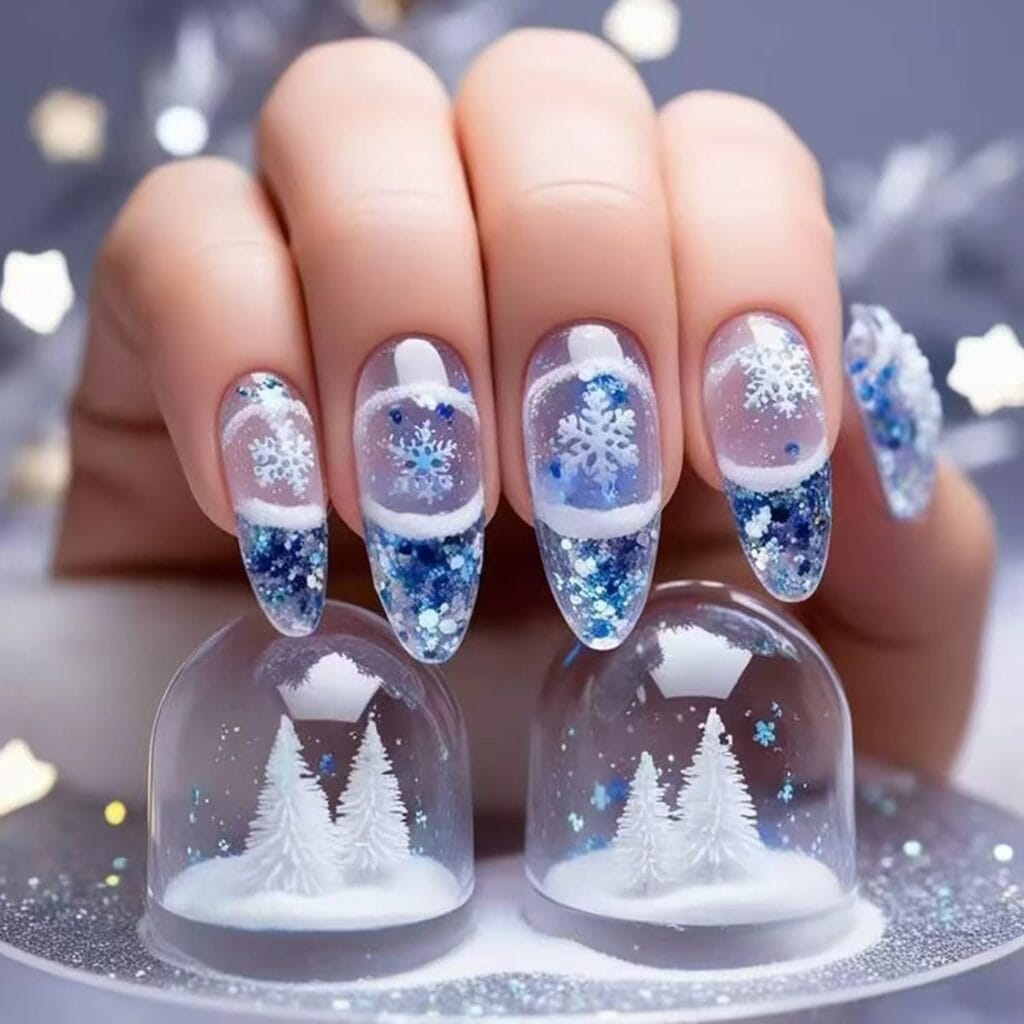
- The Frozen Lake Use a deep navy blue jelly base with clear 3D swirls on top. This mimics the look of deep water trapped under a layer of cracked ice.
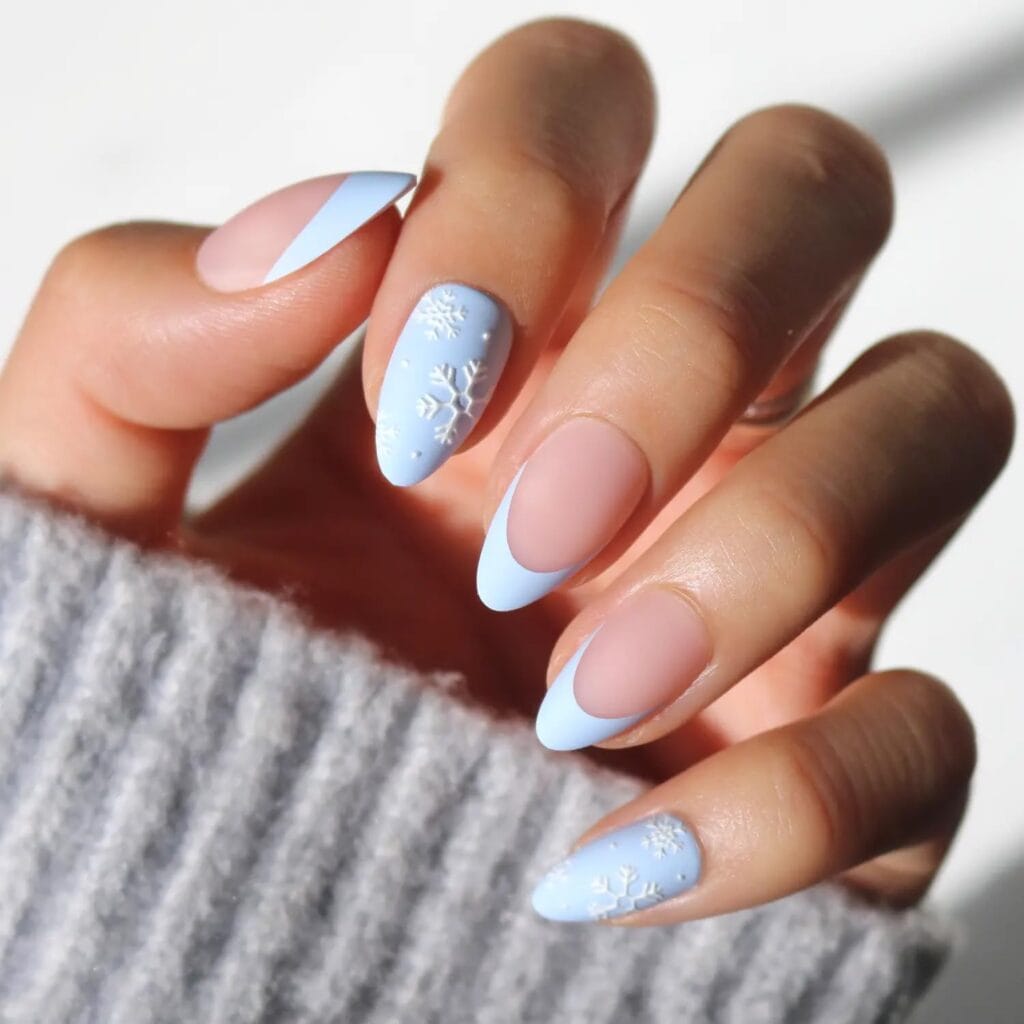
- The Glazed Donut Ice A milky white base topped with white chrome powder, finished with clear 3D droplets. This is a subtle, elegant version suitable for weddings or office wear.
- The Aurora Borealis Use a black base coat, then apply multi-chrome magnetic powder (purple/green shift). Add clear 3D texture to create a “galaxy ice” effect.
- The Pink Frost A soft, sheer pink base with iridescent flake glitter encapsulated inside. Top with matte gel, then add glossy clear water droplets for a texture contrast.
- The Silver Mirror Full silver chrome base with 3D gel applied on top. The reflection in the curves of the 3D gel creates a futuristic, liquid metal appearance.
- The Champagne Ice Use a sheer beige or nude base with gold flake accents. Add structure with clear gel to make it look like quartz crystal or amber.
By utilizing these palettes, you can adapt the Icy Nails trend to match your skin tone and personal style while maintaining the core “frozen” theme.
Troubleshooting Common 3D Art Issues
Even experienced nail artists face challenges with 3D gels. The thickness of the product introduces variables that don’t exist in flat painting. Identifying potential problems before they happen is a key strategy for durability. Here is how to solve the most common issues.
- Heat Spikes Thick layers of gel generate heat when curing (exothermic reaction). To avoid burning your client or yourself, use the “low heat” mode on your lamp or flash cure for 2 seconds, remove the hand, and repeat.
- Cloudiness / Bubbles Bubbles happen when you overwork the gel. Move your brush slowly. If you see a bubble, pop it with a needle before curing. Do not cure until the gel is perfectly clear.
- Lifting at Edges If your 3D design goes all the way to the cuticle or sidewall, it will lift. Always leave a tiny margin of flat space around the perimeter of the nail.
- Chrome Peeling If your chrome powder chips off the 3D part, you likely didn’t seal it well enough. You must apply a top coat over the chrome, ensuring you cap the edges of the 3D shape.
- Loss of Shape If your swirls flatten out, your gel is too thin or your room is too warm. Cool down the room or put your gel pot in the fridge for 10 minutes before use to thicken it.
- Uncured Center If the gel is too thick, the light won’t reach the bottom. Build your high peaks in two layers rather than one giant glob to ensure a full cure.
- Hair Snagging Sharp edges or gaps under the 3D art can catch hair. Run a thin layer of top coat around the base of your 3D design to create a smooth ramp, sealing any gaps.
- Top Coat Pooling When applying top coat over texture, it tends to pool in the dips, ruining the detail. Use a mostly dry brush to wick away excess product from the crevices before curing.
Important: 3D gel nails are thicker than normal nails. They require a period of adjustment for the wearer. Be careful when using your hands for tasks like opening cans or typing, as the added bulk changes the leverage on your natural nail plate.
Maintenance and Removal
Maintaining the clarity of Icy Nails requires more attention than a standard color. Scratches and dullness are more visible on clear, textured surfaces. Furthermore, removal must be done carefully to avoid damaging the natural nail plate under the heavy structure.
To keep the crystal look, apply cuticle oil daily, but avoid lotions that contain heavy dyes which might stain the clear gel. If the top coat begins to dull after a week, you can wipe it with alcohol or gently buff and re-apply a fresh layer of top coat to restore the wet look. Avoid using your nails as tools, as the 3D elements can snap off if subjected to sudden force.
When it comes to removal, patience is vital. You cannot soak off thick 3D gel immediately. You must debulk the nail first. Use an e-file (electric drill) with a coarse bit to carefully grind down the 3D ridges until the nail is flat. Once the bulk is removed, you can proceed with a standard soak-off method using acetone. Attempting to clip or pry off the 3D embellishments can rip layers of your natural nail, causing significant damage.
In conclusion, while Icy Nails require more effort in application and maintenance, the visual payoff is immense. They act as jewelry for your hands, catching the light and drawing attention with their unique, artistic complexity.
The Professional Edge
To truly master Icy Nails, you need to think like a sculptor. The difference between a messy DIY job and a salon-quality result lies in the refinement of the shape and the cleanliness of the application. Professional techs spend time analyzing the reflection of light on the uncured gel to ensure the curves are seamless.
- Practice control.
- Study light reflection.
- Invest in clarity.
- Master the flash cure.
- Keep tools clean.
- Experiment with viscosity.
- Prioritize prep.
Remember: Less is often more. You do not need to cover every millimeter of the nail with texture. Negative space (empty space) allows the eye to appreciate the 3D elements you have created. A few well-placed droplets are often more effective than a fully covered, chaotic surface.
Do not be afraid to experiment. Mix glitter into your clear gel, try matte backgrounds with glossy drips, or layer different colors of chrome. The “Ice” trend is versatile and open to interpretation.
Conclusion: In the end, creating **Crystal Icy Nails** is about balancing technique with creativity. It creates a stunning visual impact that fits perfectly with the winter season but is chic enough to wear year-round. By following the proper steps for preparation, sculpting, and sealing, you can achieve a durable and dazzling manicure.
Moreover, this trend allows for endless personalization. Whether you prefer a subtle quartz look or a dramatic, futuristic chrome finish, the principles of 3D gel application remain the same. Embrace the texture, play with the light, and enjoy the unique beauty of wearing art on your fingertips.
Loving this style but looking for more options? Beyond these frozen effects, I’ve curated a wide variety of professional tools, trendy polishes, and nail art essentials to suit every look. Explore my full [Nail Care & Art Collection] to find everything you need for your next creative manicure.
One thought on “Crystal Ice Nails: Creating 3D Frozen Effects on Your Nails”